Introduction
When administrator users log in to the portal they will be taken to the admin portal. This will allow them to view and edit user data, receipts and portal settings.
Index
- Home Page and Dashboard
- Customers and Users
- Users
- Broadcast
- Receipts
- Portal Settings
- Welcome and registration
- Features and functions
- Payment Processing
- Connect Setup
- Notifications
- Order Entry
Home Page and Dashboard

The Home Page is presented as a dashboard of portal activity and includes statistics and receipts and logins as well as unprocessed receipts.
- Receipt statistics will display amounts received or number of payments made for today, month-to-date, year-to-date and last year as well as a graph of the last six months of data. Use the drop-down at the top right of the graph to switch between receipt amounts and number of receipts.
- User statistics will display user or customer login data for today, month-to-date, year-to-date and last year as well as a graph of the last six months. Use the drop-down at the top right of the graph to switch between user logins or customer logins. User data represents individual users who logged in to the portal while customer data is the number of customers represented by the user logins.
- Unprocessed Receipts are the number of receipts which have not yet been inserted into the ERP system. For Sage 300 and Intact systems this will require attention as these receipts are automatically inserted when the transactions are made. Hitting the "Process" button will take you to the receipts screen and allow you to try processing them again. See "Receipts" below.
Customers, Users and Broadcasts
Users

Here an administrator (or merchant) user can search, add and edit users. Comprehensive filter options are provided to allow the merchant to find users. User lists can also be exported and imported in Excel format. This will allow an easy mechanism to import users from a previous system or external source.
In the list of users:
- Hover over the icon to the left of the user name to see the user type.
- Hover over the clock icon to see last login and registration dates
- The Status drop-down allows the merchant to easily change the current status of a user between active, inactive or declined.
- The edit (pencil) icon allows the merchant to edit the user record.
Complex password control has been implemented and requires at least 6 or more characters, at least 1 digit and at least one non-alphanumeric. Passwords are encrypted and cannot be retrieved or viewed. If a user password is lost, there is a reset function on the login page which will allow the user to reset the password. Alternatively the merchant may change the password here and notify the user.
Use the "Add User" button to add a user to the portal and complete the required information.
- User - a portal user. An AR Customer number is required to associate the user with an account.
- Merchant - a portal admin.
- Salesperson - an internal salesperson. The Sage Salesperson code is required. Access to AR accounts will be limited to customers on which this salesperson added in the AR account unless the "Allow All Customers" checkbox is checked. The portal will allow multiple user records for a Sage salesperson and the code is not verified so it is important to ensure accurate entry.
Broadcast
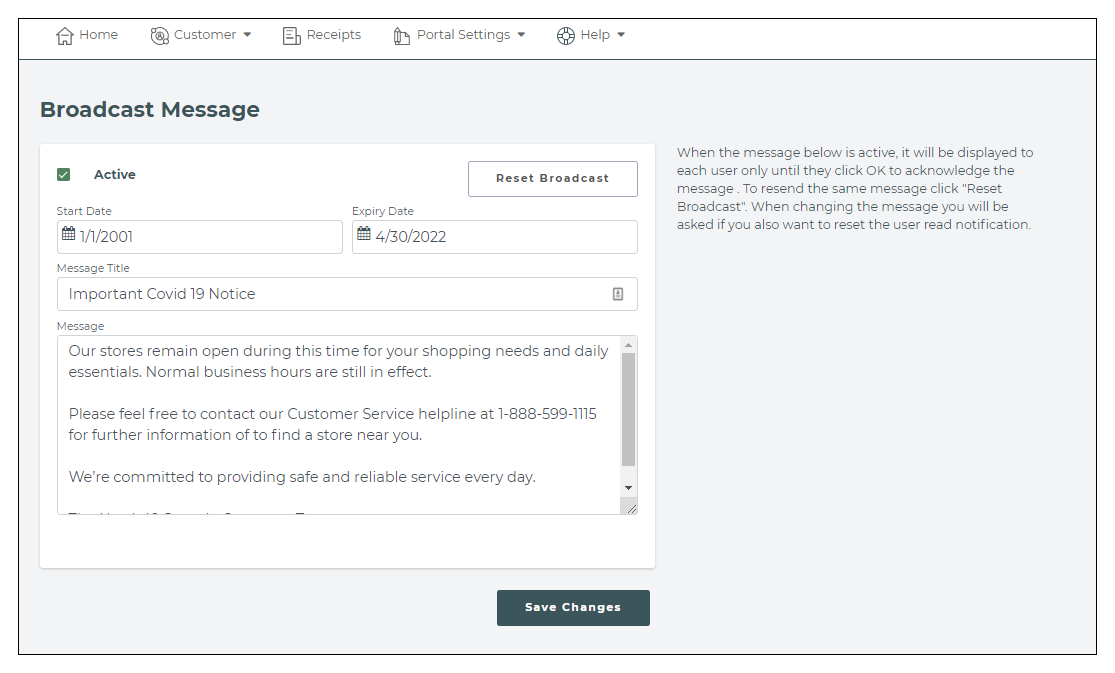
Using the Broadcast function allows the merchant to broadcast a message to all users when they log in. When a user acknowledge the message by clicking "OK" on the message pop-up they will not see it again until the merchant resets the broadcast flags or changes the message.
The broadcast message can be made active or inactive and a date range can be set, allowing the merchant to prepare a message in advance and allow the message to expire at a certain date.
Receipts
The Receipts function is a central source for all payments received through the system and will be a valuable resource for tracking receipts. The function will also allow the merchant to process transactions which did not post into the ERP system.
In Sage 300 and Sage Intact Systems there should be no unprocessed transactions since transactions are written directly into these system during processing. Unprocessed transactions indicate that something went wrong during processing. This can happen in normal business functions but if it persists or happens frequently, this should be investigated and resolved.
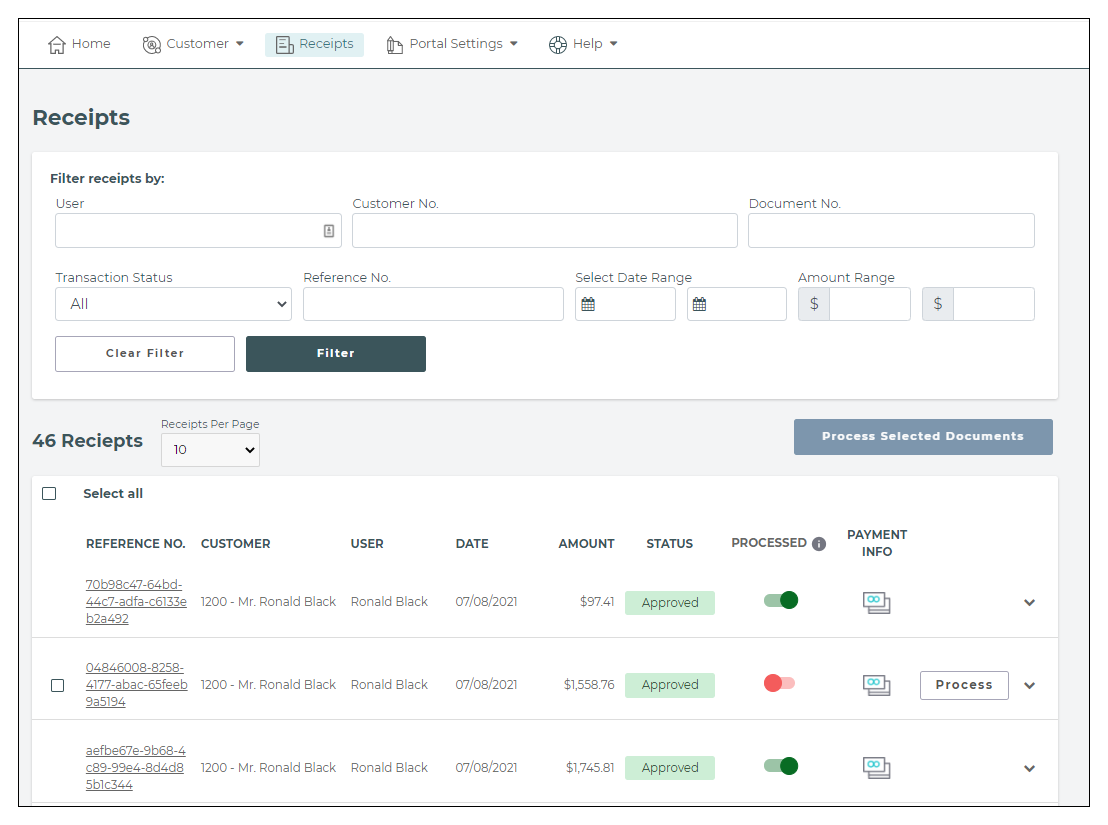
The Receipts function provides filters to easily find or filter transactions. The filters will read partial data so you could find all transactions for payment of invoices that "contain" the characters "061" without typing the full invoice number.
You can click anywhere on the receipt line to drill-down into details:

The "Processed" column will indicate the posted status of the receipt in the ERP system. If the status flag is off you will see a "Process" button which will allow you to retry the posting to your ERP. If the error which caused the original posting to fail has been resolved, the receipts will be posted into teh ERP. You may also choose to manually post the receipt in AR in which case you should manually toggle this Status flag to "processed"
Portal Settings
The Portal Settings menu is where the merchant sets features and functions and controls the behavior of the portal. Here we will deal with the following:
- Welcome and registration
- Features and functions
- Payment Processing
- Connect Setup
- Notifications
- Order Entry
Any changes made on the settings and setup pages will only be saved once you hit the "Save Changes" button. If you navigate away without saving your changes, the settings will not be updated. So remember - after you update data, hit
Welcome and registration
Welcome and registration options deals with user registration and the login page.
User registration has the following options:
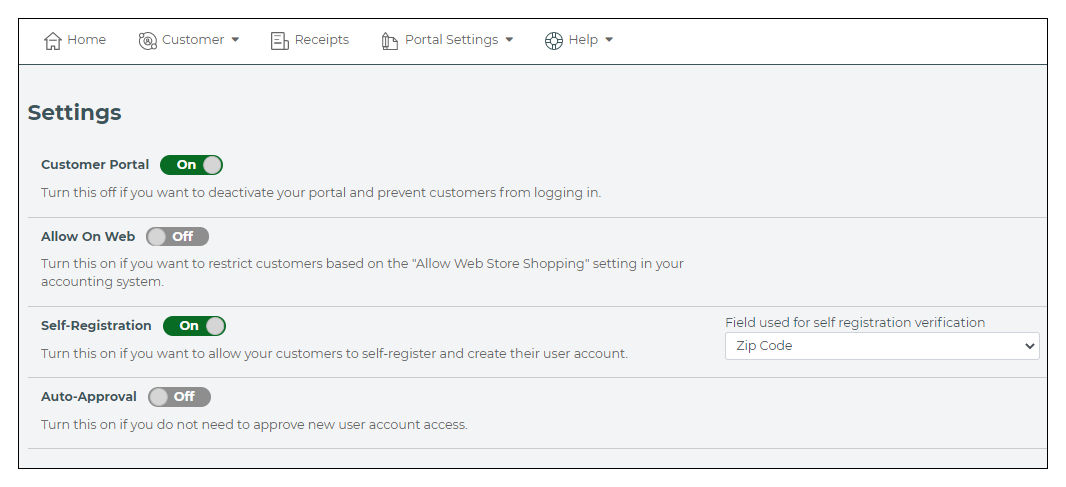
- Enable or disable the portal. Turn this off if you want to deactivate your portal and prevent customers from logging in.
- Allow on Web. Turn this on if you want to restrict customers based on the "Allow Web Store Shopping" setting in your accounting system.
- Self Registration. Turn this on if you want to allow your customers to self-register and create their user account. With this setting turned to "Off" users will only be allowed to request registration and the "Register" link on the login page will be a contact-us type form requesting user registration. You will have to manually create the user in the admin portal and send the registration info to the user. With this option turned on, the user will fill out the registration info, including a verification field which the user has to correctly complete. The verification info will be checked against the AR account in your ERP system and the options are:
- Zip code - of the billing address in the AR Customer Record
- E-mail address - primary email of the customer record.
- Last Payment amount (receipt from the customer) on the account
- Last invoice date
- Auto Approval. If you have enabled self registration you can turn this on if you do not need to approve new user account access. If you do not allow auto-approval, a merchant (admin) user will have to approve the user before access is granted.
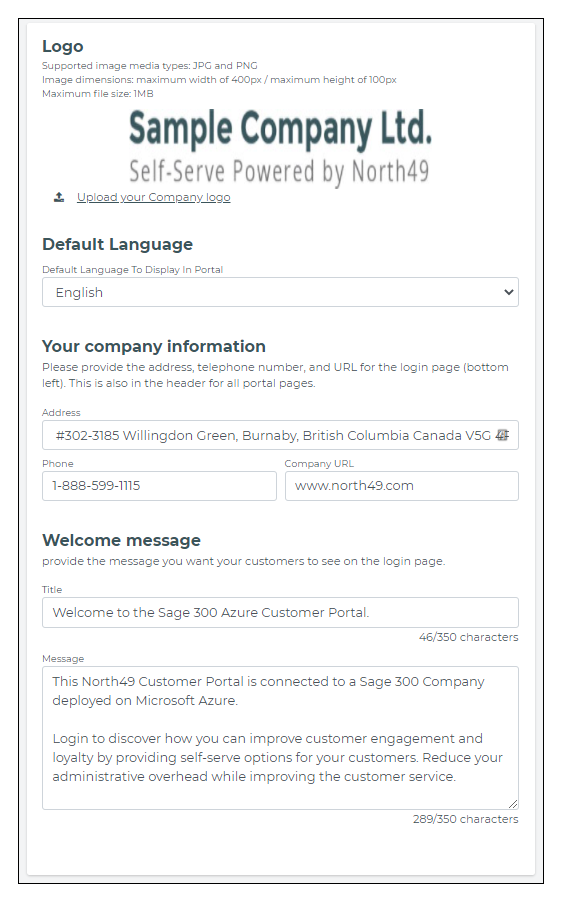
Logo - upload the logo that will appear at the top of your portal here. We have provided a wide area at the top of the page to allow you to add a message or some other info to your logo to be displayed for portal users. Supported image media types: JPG and PNG. Image dimensions: maximum width of 400px / maximum height of 100px. Maximum file size: 1MB
Default Language - set the default language of your portal here from the drop-down options. Specific users will be able to select their own default language when they visit the page. Please note that we do not translate your welcome and other messages and if you want to have multi-lingual messages you need to enter them accordingly.
Welcome message - Provide the message title and message you want your customers to see on the login page. You can change this as often as you like.
Features and functions
Features and functions allow you to control which features are available to users on the portal as well as the custom domain you have created for your portal.
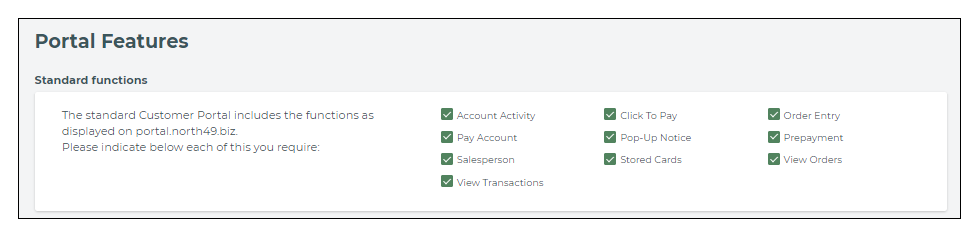
Standard functions - Enable/disable functions that you want visible on your portal. The functions available to you will depend on your subscription.

Prepayments - if you have subscribed to online payments you can also allow prepayments. There are three options available and you can enable those which you would like to make available on your portal: Since prepayments precede the invoices or documents which will require payment, additional fees or surcharges are not calculated on prepayments and can be added to the documents that require prepayments.
- Orders - allow users to prepay an order in OE. Only orders with a current balance is available for selection and the user can only select one order to prepay as this is a limitation of the function in Sage 300. The prepayment will be posted against the order in OE and will be visible directly from the order view. A prepayment entry is also created in an AR Receipt batch. Once an order has been prepaid it will no longer be available for selection.
- Quotes - allow users to make a prepayment on quotes in OE. Quotes are not a prepayment option in AR Receivables batches but it does happen that organizations would require some form of payment before turning a quote into an active order. For this reason we post the receiupt into AR as a prepay against an order but with the order number blank. If the merchant turns the quote into an order before the AR batch is posted then they simply have to open the entry and add the order number for the prepayment to automatically match the invoice when it is posted. If the merchant posts the receipt without assigning the order number, it can still be allocated using the same methodology as allocating an unapplied cash transaction. Since there is no actual prepayment on quotes, we allow the user to select multiple quotes to prepay and the merchant will treat these as an unallocated cash receipt and match them to invoices after these have been posted. The quote numbers that are being paid are entered on the receipt reference field.
- Unapplied cash payments - use for deposits, retainers and any required payments which are not associated with orders or quotes.

If you have subscribed to payment processing you may allow users to store card information so that they do not have to enter the card for each payment. The North49 Customer Portal never touches any card information and stores only the card token (or GUID) and does not affect PCI compliance. If you are using PAYA or one of the payment gateways with integrated Sage processing you may choose where card tokens are stored - on the portal or directly into the Sage system. If you use PAYA and store on Sage then the cards will be shown under the "Credit Card" tab of the AR Customer and can also be used within Sage for processing payments.

In the "View Orders" function on the portal, the order status is usually determined by looking at the order record and certain flags and fields. Orders can be On Hold, Awaiting Shipment, Partially Shipped, Shipped, Partially Invoiced and Invoiced. If the merchant requires more detailed order status tracking he can select to use the contents of the optional field ORDSTATUS to display as order status. This will allow complete flexibility for the merchant to report status of an order.
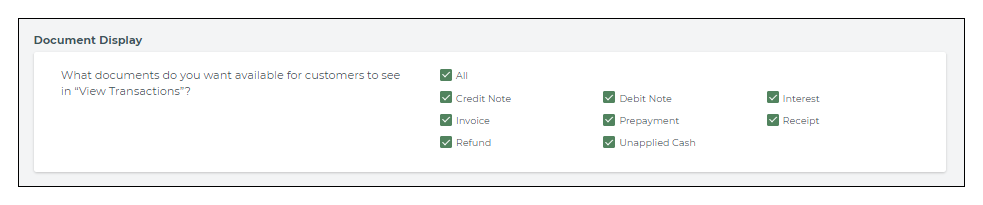
Select which document types you want to make available to your customers to view in the "View Transactions" function in the portal.

Enter the custom domain/address of your portal. See "Set Up A Custom URL For Your Portal"
Payment Processing
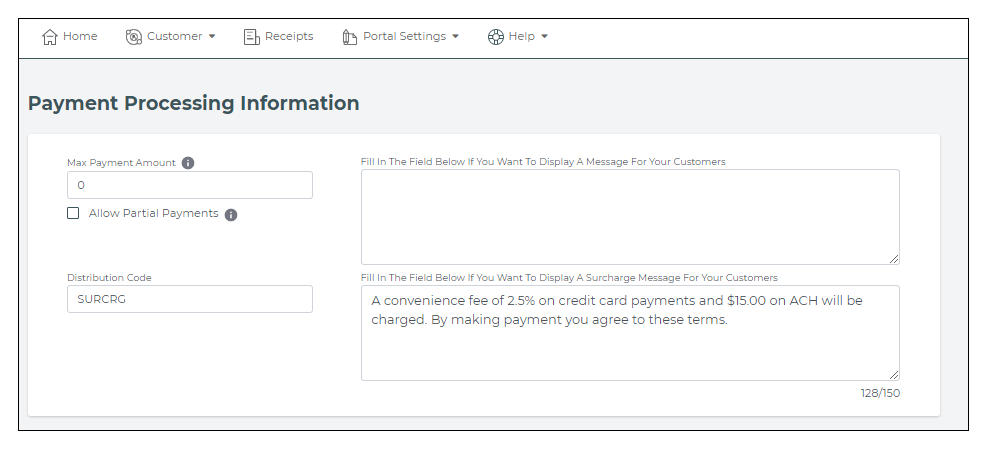
This tab contains certain functions which control payment processing on the portal as well as the payment gateway setup. Please see
Payment Processing for detailed articles regarding payments of the portal
Supported Gateways for details on supported gateways and how to set them up.
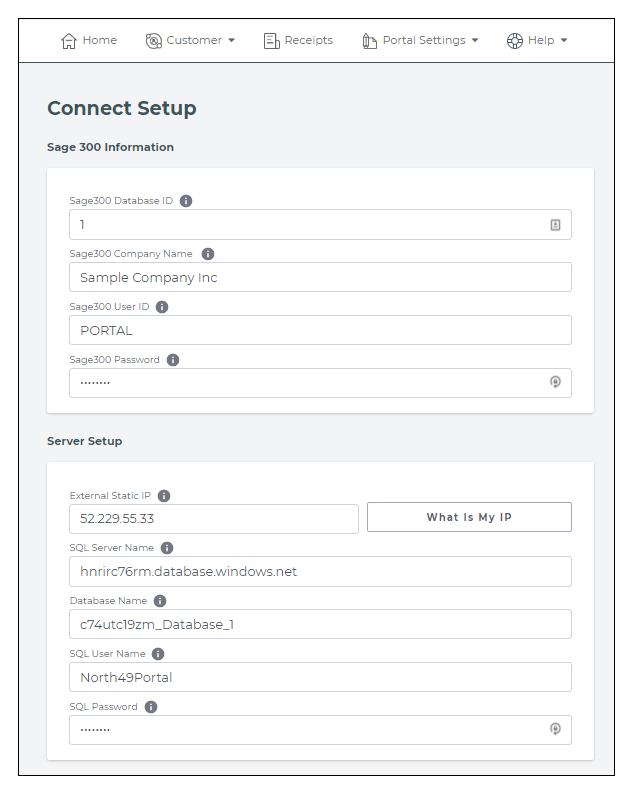
Connect Setup
"Connect" is the web service which is installed on the system which hosts the ERP system and which is responsible for the communication between the portal and the internal system. This screen shows the connection information with both the Sage 300 and the SQL databases and is read real-time from the Connect Settings. Unless you are familiar with the connection settings on the screen it would be advisable to contact North49 before making changes to these.
Notifications
There are four sections of notifications to the merchant (or portal owner) and one section which deal with notifications to the AR company. This screen does not control notifications to the portal user, who is always notified via email of any transactional activity (requesting help/contact, making a payment or placing an order).
Notifications to the Merchant:
- Technical Contact is notified regarding technical issues on the portal. Typically these would be issues where the portal cannot establish contact with the ERP system. The technical contact will be notified to check Connect or contact North49 Support.
- AR Contact will receive notifications for:
- New portal user requiring approval.
- Payments received through the portal
- Incomplete payments
- Order Entry contact will be notified of new orders placed on the web.
- Contact Us will receive notifications from the "Contact Us" forms on the portal. This would typically be customer support type issues.
Each of the four types of notifications above have their own contact details and can be set up to correctly notify relevant persons of transactions on the portal. Merchant notifications can be sent via any of the following:
- Email. You can only enter one email address but email notifications can of course be sent to an email distribution list if you have set that up in your email system. This will ensure that you can control internally who gets the emails and allows the greatest level of control and customization of email notifications.
- Slack. Slack is a widely used messaging system and notifications sent to slack are immediately available on whatever platform the user has installed. There are desktop, iOS and Android versions available and a free version of Slack is often enough for the notifications from the portal. Using this option (or MS Teams - see below) will ensure that merchant staff are immediately notified when their attention is needed, regardless of where they are or which equipment they are using. Portal notifications are sent to Slack channels and allows for specific (and separate) channels for each notification type, if required.
- Teams. Microsoft Teams is a robust and very scalable communication platform and the portal integration into Teams allows for instant notification to the merchant. Notifications are sent to channels for each notification type and by assigning relevant internal staff to the channels you can ensure appropriate response to messages received from the portal.
To set up Slack and Teams notifications, see this Knowledge Base Article.
Notifications to the AR Customer
These notifications are sent via email to the email address on the AR Customer record and includes notifications that a new user has registered and/or orders have been placed for the AR Account.
Order Entry
- Default Location - the portal will use this location to order from. You may choose to use the location on the AR record or override the customer location and always use the default location
- Default Price List - this will be the price list used unless you select to use the customer price list on the AR record. All Sage 300 pricing models are implemented on the portal, including discounts, contract and sale pricing
The portal will limit the items available for a client to only those items that are on the pricelist being used. This allows the merchant to sell only a selected reange of products on the portal.
.
- Allow only selling UOM - this wioll limited the units of measure which can be selected for an item to only those on the price list. If you select "No", all unites of measure set up for the item will be available to select when placing an order.
- Post orders on hold - if "Yes" then orders are posted to OE On Hold. This will allow internal staff to review before releasing the order for shipment.
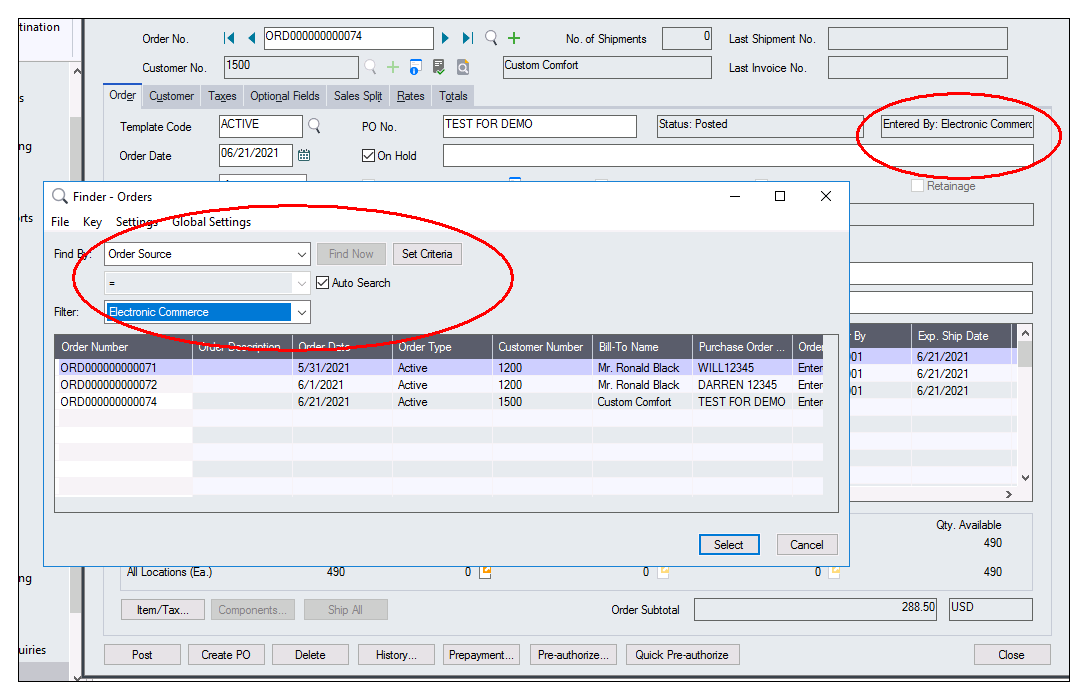
Order from the portal are posted into OE with an order source of "Electronic Commerce". This makes it easy to filter down to orders from the portal.
- Allow miscellaneous charges will allow user to add miscellaneous charges to the order. When a user enters a search string for the item in order entry, miscellaneous charges will also be searched.
- Allow price override - will allow a user to change the unit price. You may allow this for all or only salespersons.
- Post as order, quote or both - orders placed on the portal can be posted to OE as orders or a quotes and you may allow both options for users to choose from. Allowing users to post a quote is essentially an RFQ (Request for Quote) system where the user requests a quote which is reviewed, modified and approved by the merchant company and then presented back to the user for approval.
- Allow creating orders from quotes - will allow the user to review an approved quote in the "View Orders" function in the portal and turn the quote into an active order in OE.
The portal allows for specific functionality using quotes - both that they may be posted from the portal but also that they can be used to present a quote to a customer for approval and also allowing the user to turn the quote into an active order if they accept the quote. To control quote approval, add the optional field "QTRELEASED" (Type Y/N) to order headers. If this field is set to "Yes" the quote has been reviewed and approved by the merchant and the user may then turn the quote to an order (if this has been allowed).
- Include customer item number in search - if you use and maintain customer item numbers in IC (I/C Customer Details) then you can allow the find function to also search these records for matching items. It is useful to allow a customer to find an item by using their own item/sku number. Do not turn this on if you do not use this data as it will slow down the finder.
The portal does not store any Sage 300 data on the cloud/web servers. When a user types a string for the finder the portal will search the item/sku number, item description and 4 additional item information lines and optionally also the customer item number is included in the search.
- Allow ship via entry - will show this field on the order for selection by the customer. If you use this field in OE for internal purposes you can disable it by selecting "No".
- Show item details - will show the 4 additional item information lines when an item has been selected.
- Store item images - you may choose to include item images when a user selects an item. These images can be stored on the portal servers or you may choose to host the images elsewhere and simply provide a URL where the images will be stored. The product image must be named the same as the item/sku number excluding any item number segment dividers. For example, the image for item C1-250/B will be c1250b.jpg.