Table of Contents
Introduction to PayFabric Sage 300
Setup a Gateway Account Profile
PayFabric Gateway Account Profile Setup
PayFabric Transaction Screen additional information:
PayFabric Transaction Screen Buttons
Prevent users from processing on PayFabric Forms
Prevent users from accessing certain PayFabric Sage Forms
Record Types supported for PayFabric Receivables
Record Types supported to be imported to Sage
Introduction to PayFabric:
PayFabric is a cloud-based payment acceptance platform and storage hub that can be integrated with any application, platform, and back office environment with ease and simplicity.
PayFabric offers real-time transaction processing for both credit card and ACH transactions while meeting the highest standards of security. PayFabric helps merchants reduce the scope of their PCI compliance by helping to remove credit card access from applications. By connecting to PayFabric, 3rd party applications are relieved of any access to sensitive credit card numbers. PayFabric can easily be integrated with applications to allow for shared management of customer’s credit card and ACH data.
Introduction to PayFabric Sage 300
PayFabric for Sage 300 is an add-on service to Sage 300 that provides businesses the tools to
process payments for order entry and accounts receivable.
By leveraging the payment processing power of PayFabric, this offers real time payment processing for both credit card and ACH transactions while ensuring the highest standards of security are addressed. This document covers how to configure and utilize PayFabric for Sage 300 features and functionality.
Prerequisites
The following items should be obtained before starting with PayFabric for Sage 300.
PayFabric Organization Account
To use PayFabric for Sage 300, the organization must first be setup in PayFabric.
To setup an account for testing, go to https://sandbox.payfabric.com/Portal/Account/Register.
To setup a production account contact the PayFabric partner, or Sales@PayFabric.com.
To use PayFabric for Sage 300, it is assumed that the PayFabric account is setup for the organization and has an existing Payment Gateway Account Profile configured.
For more information on the setup and usage of PayFabric, refer to the PayFabric Portal Guide.
http://www.nodus.com/documentation/PayFabric-User-Guide.pdf
Installation
The PayFabric for Sage300 application requires a physical install.
For installation support please contact the PayFabric partner, or Sales@PayFabric.com
Webview2
A merchant's workstations will need to have the webview2 application installed for the PayFabric for Sage300 application to work. Most workstation will have this pre installed with the Microsoft edge browser, however through the installation process the PayFabric partner or Support contact will run this setup.
For support around this please contact; support@PayFabric.com
Support
For support related inquiries or for questions not found within this document, contact PayFabric Support for further assistance.
| Contact Method | Address/Numbers |
| support@PayFabric.com | |
| Website | https://www.payfabric.com/us/support.html |
| Telephone | (909) 482-4701 |
PayFabric Setup
Create a PayFabric Account
The organization must first be setup in PayFabric. If a new account is needed, go to one of the
following pages to setup an account:
Live Production Account: Contact Sales@PayFabric.com
Testing Sandbox Account: https://sandbox.payfabric.com/Portal/Account/Register
Create a Device
The following steps can be used to create a Device in PayFabric to authenticate the connection
between PayFabric and Sage 300.
1. Log into the desired PayFabric account
2. From the left menu, navigate to Settings > Dev Central
3. On the ‘DEV Central’ page, select the Themes tab
4. Click the ‘Create New +’ button and enter a name for the theme as ‘sage300’.
5. The below is the CSS code for the Sage300 Theme
.Wallet{
background-color: #d9d9d9;
font-family: 'Arial', Times, serif;
}
.Wallet .CardContainer{
padding: 0px!important;
background-color: transparent!important;
}
.Wallet input[type=button],
.buttonContainer input[type=button]{
background-color: #E7E3E7;
color: #000000;
border-color: #777777;
}
.Wallet .CardContainer .NameOnCard .LastName{
margin-left: 14px;
}
input:not(.showPlaceholder)::-webkit-input-placeholder { /* WebKit browsers */
color: transparent!important;
}
input:not(.showPlaceholder):-moz-placeholder { /* Mozilla Firefox 4 to 18 */
color: transparent!important;
opacity: 1;
}
input:not(.showPlaceholder)::-moz-placeholder { /* Mozilla Firefox 19+ */
color: transparent;
opacity: 1;
}
input:not(.showPlaceholder):-ms-input-placeholder { /* Internet Explorer 10+ */
color: transparent!important;
}
input:not(.showPlaceholder)::placeholder{
color: transparent!important;
}
.checkboxDiv , .setIsSaveCard , .walletListDiv, #WalletID{ display: none ;}
.billAddressLine2Div label{ display: none; }
.billStateCodeDiv{
display: flex;
flex-direction: column;
}
.selectState{
order: 2;
}
.submit-form-button{
background: #30a6df;
color: #fff;
border: none;
}
.submit-form-button:hover,.submit-form-button:focus{
background: #2d6da9 !important;
}
.creditCardNumberDiv label{
width: 100%;
}
.Email_CreateWallet{
display: none;
}
#Billto_Email{
display: none;
}
6. Copy all the text from the note above
7. Browse back to the PayFabric page and paste the copied text into the ‘Custom.css’ field
8. The below is the JS code for the Sage300 Theme
//change MM YY to exp date
if ($(".CardContainer").length > 0){
$("#exptime1, #exptime2").addClass("showPlaceholder");
}
if ($(".creditcardBasicInfo").length > 0){
$(".expirationMonthDiv label").html("Exp. Date");
$(".ExpirationYearDiv label").html("");
$(".creditcardBasicInfo .expirationMonthDiv input,.creditcardBasicInfo .ExpirationYearDiv input").addClass("showPlaceholder")
}
if ($(".creditCardNumberDiv").length > 0){
$(".creditCardNumberDiv").prepend("<label>Card Number</label>")
//$(".creditCardNumberDiv input").addClass("w-100")
}
//insert label before input
$(".form-group input").each(function(index){
//ignore if it have label or its inside a subgroup
if(!$(this).prev().is("label") && !$(this).parent().hasClass("input-group")){
$(this).before("<label>"+$(this).attr('placeholder')+"</label>")
}
});
//change placeholder
if(!document.getElementById('CreditCardNumber')){
$("#CardHolderName").siblings("label").html("Account Holder Name")
$("#CardHolderName").prop('required',true);
// change required error text
//$("#CardHolderName").attr("data-val-required","this field is required.");
document.getElementById("CardHolderName").placeholder = "Account Holder Name";
}
$("#payButton").on("mousedown",function(e){
let inputs = $(".is-invalid");
if( inputs.length>0 ) {
setTimeout(function(){
inputs.focus();
inputs.blur();
$("#payButton").prop("disabled",false);
},500)
$("#payButton").prop("disabled",true);
e.preventDefault();
e.stopPropagation();
}
});
9. Copy all the text from the note above
10. Browse back to the PayFabric page and paste the copied text into the ‘Custom.js’ field
11. Click the Save button to save the changes to the theme
12. After the save is complete, select the Device Management tab
13. Click the Generate button to present the fields for creating a Device
14. Populate the Device Name field with the name Sage300
15. Populate the Password and the Confirm Password fields with a secure password. Please take note of this password as it will be used again shortly.
16. Click the Confirm button to generate the device
17. Take note of the Device ID as it will be used shortly.
18. In the Device List, click the Shirt icon in the Default Theme column for the newly created device
19. Select the Theme name for the Theme that was created in the previous steps
20. Click the Confirm button to save changes.
Setup a Gateway Account Profile
In order to process transactions, a Gateway Account Profile should be setup in the PayFabric
account. The page for setting up a Gateway Account Profile can be found in the menu under
Settings > Gateway Account Profiles.
For more information on setup of the Gateway Account Profile and using PayFabric in general,
please see the PayFabric Portal Guide. https://www.nodus.com/documentation/PayFabric-User-Guide.pdf
PayFabric for Sage300 Setup
The following process will configure the connection to PayFabric within Sage 300.
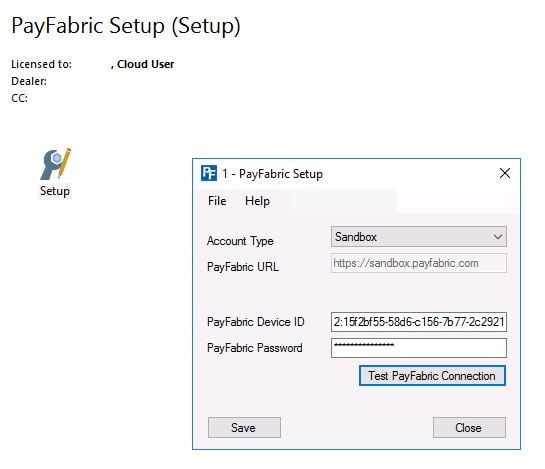
1. Navigate to the PayFabric Setup Screen within the PayFabric folder.
2. Populate the fields based on the below table
| Field | Value |
| Account Type |
Account Type: Based on the PayFabric environment being used, set this value to Live or Note: Other is used for bespoke URL's and this would be communicated by your PayFabric Partner if needed. |
| PayFabric URL |
PayFabric URL: This field will automatically be set after the account type is configured. Note: Other is used for bespoke URL's and this would be communicated by your PayFabric Partner if needed. |
| PayFabric Device ID | PayFabric Device ID : Set this value to the PayFabric Device ID created for Sage300 during the previous Create a Device section. |
| PayFabric Password | PayFabric Password: Set this value to the password associated to the PayFabric Device ID for Sage300. |
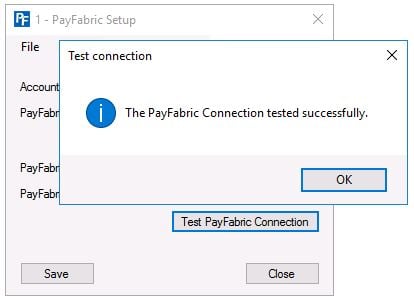
3. After the settings have been configured, select the Test PayFabric Connection option to verify if the information is configured correctly.
4. If the credentials are correct the test connection will display a success message. Otherwise an unsuccessful message will display and require you to enter your credentials again.
SQL Authentication
SQL authentication is needed for the PayFabric Application to write and read to the Database.

Options:
Ability to use windows login for authentication
OR
Specific login ID and Password for the SQL server
Merchant will need to Provide Details regarding
SQL Server
Database
Login ID
Password
Security access for the user will need read and write as need for writing to CS app and creating EP Tables (PayFabric Transaction Tables)
After the settings have been configured, select the Test SQL Connection option to verify if the information is configured correctly.
If the credentials are correct the test connection will display a success message. Otherwise an unsuccessful message will display and require you to enter your credentials again.
PayFabric Receivables Set up
The following fields are required to connect PayFabric Receivables to your Sage 300 environment.

Receivables Portal Name:
Name for the customer portal, this will also be used in the URL address when customer users access the customer portal.
Settings > Receivables > Company Information > Portal Name
Receivables Integration Key:
The key value to be used by integrating applications to exchange data with the PayFabric Receivables API.
Settings > Receivables > Integration Connection > Integration Key
Receivables Integration Key Password:
The password for the integration key to be used by integrating applications to exchange data with PayFabric Receivables API.
Settings > Receivables > Integration Connection > Integration Key Password
After the settings have been configured, select the Test Recievables Connection option to verify if the information is configured correctly.
If the credentials are correct the test connection will display a success message. Otherwise an unsuccessful message will display and require you to enter your credentials again.
Sage 300 Authentication
Sage 300 authentication is needed to connect to PayFabric Receivables. The below fields are required when connecting to PayFabric Receivables.

Sage Company ID:
This will display the Sage Company ID
User ID:
For this a new Admin service User will need to be created. Please note this will require a User License. Once the User is created as per the below, the User ID will need to be entered here.
Creating the User:
Navigate to Administration Services > Users
Enter User ID and User Name (PFRUSER is recommended to identify easy)
Account type set to User
Authentication Method set to Sage 300
Make sure account is disabled is unchecked
Make sure password never expires is checked
Navigate to Administration Services > User Authorizations
Give the user permissions for AR, OE, OE SHipment, AR customers, Receipt Entry.
Password:
User created above password will need to be entered here.
After the settings have been configured, select the Test Sage Connection option to verify if the information is configured correctly.
If the credentials are correct the test connection will display a success message. Otherwise an unsuccessful message will display and require you to enter your credentials again.
PayFabric Gateway Account Profile Setup
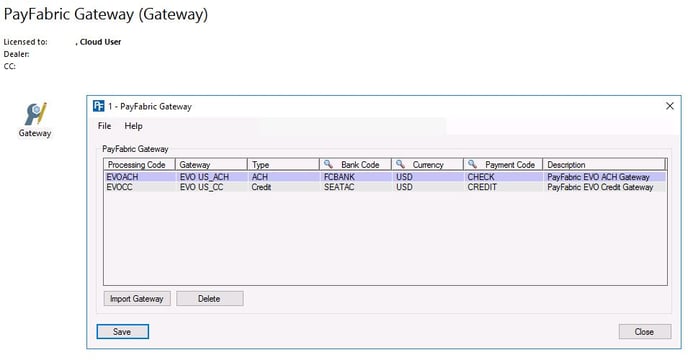
The PayFabric Gateway page displays the available PayFabric Gateway Account Profiles that are connected to electronic payment processing accounts inside Sage 300.
1. Navigate to the PayFabric Gateway Screen within the PayFabric folder.
2. Select Import Gateway Button. This will import all gateways created for the organization inside of PayFabric.
3. After the Gateways are imported, populate the fields based on the below table
| Field | Value |
| Processing Code | Processing Code: Free text field. This allows the ability to assign a Processing code that will hold the collection of this data for easy entry when creating the transaction. |
| Gateway | Gateway: Field will display the name of the PayFabric Gateway. Import button will populate the Gateway name from PayFabric. |
| Type | Type: Field will display the tender type to be used for the transaction, either Credit Card or ACH. This value will automatically be populated based on the supported tender type of the PayFabric Gateway Profile associated to the Payment Code. |
| Bank Code | Bank Code: Sage300 Field. Available finder to open the sage Bank Screen to select the bank code to be assigned to the Gateway |
| Currency | Currency: Sage300 Field. Available finder to open the Sage Currency Screen to select the currency to be assigned to the Gateway |
| Payment Code | Payment Code: Sage300 Field. Available finder to open the Sage Payment Code Screen to select the Payment Code to be assigned to the Gateway |
| Description | Description: Free text field. Allows the user to input a description/notes of the gateway. |
4. Once gateways are set up, click the Save button to save changes.
Import Gateway
Import gateway button is to retrieve any setup Gateway Account Profiles from PayFabric.
Delete Gateway
This allows the merchant to delete any gateways that have been imported from PayFabric. Note this does not delete the gateway within PayFabric, but rather removes the gateway as an option to process through, within Sage300. Any Pending transactions will fail, if tied to a Gateway that is being deleted. It is advised to settle all transaction first before deleting a Gateway.
PayFabric Wallet
The PayFabric Wallet is where the customer’s payment methods can be saved, edited, or deleted. To access the PayFabric Wallet, select the Wallet option from the PayFabric menu.
View Saved Payment Detail
- Select an AR customer by entering in the Customer No. or using the Sage 300 tools to look up or create a new AR customer.
- This will load all existing wallets for the selected AR customer

Add a new Payment Method through Direct Input
- Select an AR customer by entering in the Customer No. or using the Sage 300 tools to look up or create a new AR customer.
- Click Add Credit Card or Add ACH buttons.
- This will open the PayFabric Hosted Wallet page where you can securely add Credit Card or ACH details. Note this is PCI compliant and no Credit Card/ACH data will be touching your internal Sage 300 environment.


Edit Saved Payment Method Detail
- Select a customer by entering in the Customer No. or using the Sage 300 tools to look up or create a new AR customer.
- Highlight the row which needs to be edited.
- Click Edit button.
- This will open the PayFabric Hosted Wallet page where you can update the card expiration date / cardholder name or the billing information for the payment method.
Delete Saved Payment Method
- Select a customer by entering in the Customer No. or using the Sage 300 tools to look up or create a new AR customer.
- Highlight the row which needs to be deleted.
- Click Delete button.
- This will delete the Wallet from PayFabric storage, and will no longer be associated to the AR customer.
Refresh Saved Payment Details
- Select a customer by entering in the Customer No. or using the Sage 300 tools to look up or create a new AR customer.
- Click Refresh button
- This will pull in the wallet/payment method records from PayFabric. If Payment Methods are added directly into PayFabric this will import them into Sage 300.
Selecting a Default Payment Method
- Select a customer by entering in the Customer No. or using the Sage 300 tools to look up or create a new AR customer.
- Highlight the row which needs to be edited.
- Click Edit button.
- This will open the PayFabric Hosted Wallet page where you are able to select the tick box to enable the payment method as default. The far right column will then update with the default as YES for this payment method.
Processing a Transaction
PayFabric Transaction Screen
The PayFabric transaction screen is where the merchant is able to process a transaction on the document that is selected.
Sage 300 screens that support PayFabric processing include, Order Entry, Shipment Entry, AR Receipt Entry and AR invoice Entry.
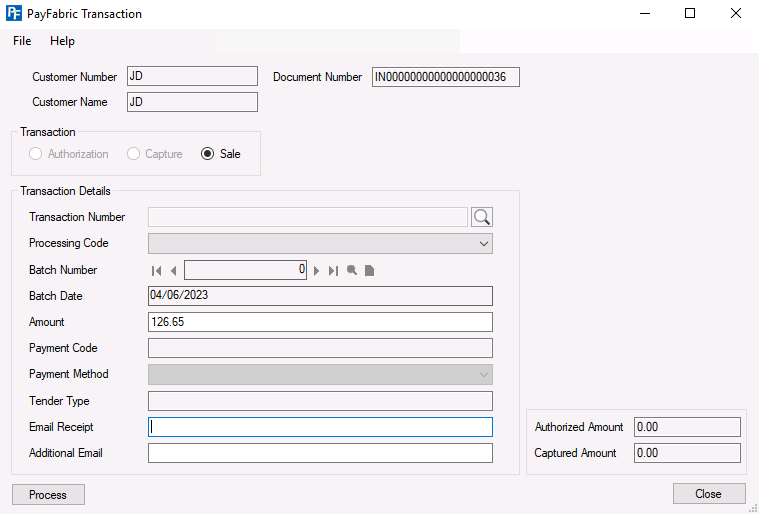
Example of PayFabric Transaction window from AR Invoice.
The transaction types (Authorization, Capture, Sale) will be available depending on the document type that the merchant is trying to process against (more detailed explanations in PayFabric Forms section below).
The below fields within the transaction screen are informational and across every document the merchant is able to process on.
| Field | Description |
| Customer Number | Customer Number: This will display the Number that is assigned to the AR Customer. |
| Customer Name |
Customer Name: This will display the Name of the Customer the document is created for. |
| Document Number | Document Number: This field displays the number of the document. |
Note: Processing through a new payment method on any document type will not save the card to the wallet.
For example, below are steps to process on an AR Invoice.
- Navigate to Accounts Receivable > A/R Transactions > PayFabric Invoice Entry
- Select a batch
- Add new entry to the batch
- Populate a customer
- Add line items
- Click add button
- Click PayFabric button
- Select the processing code (CC or ACH)
- Click the dropdown for payment method and select the New option
- Click Process, this will open the PayFabric MRHPP to input payment method details

Example image of the PF MRHPP for Credit Card.
The different transaction types currently supported through PayFabric, are explained below.
Transaction Types
Authorization
An Authorization transaction makes a request to verify and hold the funds for a payment that will be captured in the future. Authorization type transactions are only available if the Processing Code is associated to a Payment Gateway Profile that is setup to process Credit Cards. To initiate an Authorization transaction, select the Authorization radio button in the PayFabric Transaction screen.
The following describes which fields need to be completed to process an Authorization transaction.
| Field | Description |
| Transaction Number |
Transaction Number: Not used for Authorization Transaction type. The transaction number will be created after processing an authorization, and will be used when doing a Capture transaction type. |
| Processing Code |
Processing Code: This dropdown will be used to select gateways that are defined in PayFabric Gateway Setup. This could be either a Credit Card gateway or ACH gateway. The list of processing codes that will display to the user will be filtered by the gateway currency set that matches the documents currency. |
| Batch Number | Batch Number: Not used for Authorization Transaction type. |
| Batch Date | Batch Date: Not used for Authorization Transaction type. |
| Amount | Amount: The amount to be authorized for the transaction. This will automatically pull form the Sage document outstanding amount for Order, Shipment and Invoice Entry. For AR Receipt it will pull in the amount specified on the receipt. |
| Payment Code | Payment Code: The payment code that is associated to the processing code as defined in the PayFabric Gateway Setup. This field is read-only. This is a Sage tag field. |
|
Payment Method |
Payment Method: This dropdown will contain saved wallets for the customer. The default payment method will be preselected if set up in the AR Customers wallet. Additionally, it will offer the option to use a new payment method. |
| Tender Type | Tender Type: The tender type that is associated to the processing code as defined in the PayFabric Gateway Setup. This field is read-only. |
| Email Receipt | Email Receipt: The email to receive the email receipt for the transaction. |
| Additional Email | Additional emails that the email receipt can be sent to for the transaction. Multiple emails should be separated by a comma. |
Note: The Authorization transaction type will only allow for credit card processing codes.
The following documents/ Sage 300 Entry Screens, will allow for an Authorization to be processed:
- Order Entry
Capture
A Capture transaction makes a request to capture the funds held by a pending Authorization
transaction. To initiate a Capture transaction, select the Capture option in the PayFabric transaction screen when a pending Authorization has already been processed against the associated document.
- If a single pending Authorization is associated to the document, the PayFabric Capture
window will be opened to determine the amount of the transaction to be captured. - If multiple pending Authorizations are associated to the document, the user will be directed to the PayFabric Transaction Number Screen to determine which transaction(s) should be captured, after selecting the Capture option from the menu.
Transaction Number Screen
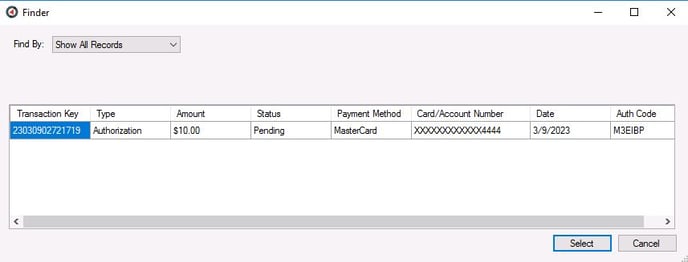
To access this screen select the look up function to the right of the text box.
![]()
Any document with open authorizations will have the ability to use the Transaction number screen. This screen will allow the merchant to select the authorization they want to capture against. The below details the fields within this screen.
| Field | Description |
| Transaction Key | Transaction Key: PayFabric transaction number |
| Type | Type: Transaction type: Authorization |
| Amount | Amount: Authorization transaction amount |
| Status | Status: Status of the transaction from PayFabric |
| Payment Method | Payment Method: Card Type: Visa, MasterCard, American Express, Discover... |
| Card/Account Number | Card/Account Number: The last 4 digits of the card associated to the Authorization. |
| Date | Date: Date for when the Authorization was processed |
| Auth Code | Auth Code: Authorization code from PayFabric |
Note: When an authorization has a capture against it, if this is either a partial capture or for the full amount of the authorization, the authorization will be closed. If more funds need to be captured a new authorization will need to be created or a Sale transaction completed.
Once an authorization is selected to capture the following fields will need to be completed to process the transaction:
| Field | Description |
| Transaction Number | Transaction Number: The number assigned to the authorization transaction. |
| Processing Code | Processing Code: This will be preselected based on the processing code used for the authorization |
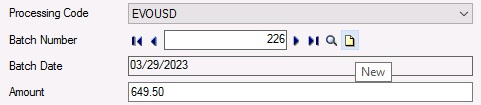
| Batch Number | Batch Number: Batch Number is the number assigned to each transaction. Batch Number will be auto selected for the user, by the most recently created open batch which matches the Bank and Currency of the selected processing code.
Additionally, selectable batches are filtered by the bank code and currency code. |
| Batch Date | Batch Date: This field will display the creation date of the selected batch. If a new batch is created, it will display the current session date. |
| Amount | Amount: The amount to be captured for the transaction. This will automatically pull the full amount from the authorization selected. |
| Payment Code |
Payment Code: The payment code that is associated to the processing code as defined in the PayFabric Gateway Setup. This is pre-filled with the payment code used in the authorization. |
|
Payment Method |
Payment Method: The payment method will be the card that was used to process the authorization against. This will be pre-filled. |
| Tender Type | Tender Type: The tender type that is associated to the processing code as defined in the PayFabric Gateway Setup. This is pre-filled with the tender type used in the authorization. |
| Email Receipt | Email Receipt: The email to receive the email receipt for the transaction. |
| Additional Email | Additional Email: Additional emails that the email receipt can be sent to for the transaction. Multiple emails should be separated by a comma. |
After the Capture transaction is approved, the Authorized and Captured Amount will be updated in the Amounts pane on the bottom right of the PayFabric Transaction Screen.
Note: The Capture Transaction Type will be un-selectable if there are no existing authorizations associated to the document.
The Capture button will only be active when there is an open authorization related to the document.
The following scenarios are examples:
Open Authorization on a Order Entry document will allow for the capture button to be selectable on the Order Entry.
Open Authorization that is carried over to a Shipment Entry document will allow for the capture button to be selectable on the Shipment Entry.
The following documents/ Sage 300 Entry Screens, will allow for an Capture to be processed:
- Order Entry
- Shipment Entry
Sale
A Sale transaction makes a request for an immediate capture of a payment without a previous
authorization. To initiate a Sale transaction, select the Sale option in the PayFabric Transaction Screen.
The following describes which fields need to be completed to process a Sale transaction.
Transaction Details:
| Field | Description |
| Transaction Number |
Transaction Number: This field is not used for the Sale transaction type. |
| Batch Number |
Batch Number: The batch number assigned to each transaction. Batch Number will be auto selected for the user, by the most recently created open batch which matches the Bank and Currency of the selected processing code. Additionally, selectable batches are filtered by the bank code and currency code |
| Batch Date | Batch Date: This field will display the creation date of the selected batch. If a new batch is created, it will display the current session date. |
| Amount | Amount: The default amount for the transaction. This field is automatically calculated based on the outstanding document amount. This amount is automatically recalculated whenever the outstanding document amount changes or a transaction is processed. |
| Processing Code |
Processing Code: This dropdown will be used to select gateways that are defined in PayFabric Gateway Setup. This could be either a Credit Card gateway or ACH gateway. The list of processing codes that will display to the user will be filtered by the gateway currency set that matches the documents currency. |
| Payment Code | Payment Code: The payment code that is associated to the processing code as defined in the PayFabric Gateway Setup. This field is read-only. |
| Tender Type | Tender Type: This read-only field will display the Tender Type associated to the processing code. The available options that would be displayed are Credit Card or ACH. |
| Payment Method | Payment Method: This dropdown will contain saved wallets for the customer. The wallets displayed will be filtered based on the processing code. Eg. If an ACH processing code was selected, this dropdown will displayed saved ACH wallets. |
| Email Receipt | Email Receipt: The email address used for email receipts. This field will automatically be populated based on the email address assigned to the E-mail field under the Address tab of the A/R Customer |
| Additional Email | Additional Email: Any additional e-mail addresses to be copied on email receipt notifications. This field will automatically be populated based on the email address assigned to the E-mail field under the Contact tab of the A/R Customer. Note to add multiple the email address need to be separated by a comma. |
PayFabric Transaction Screen additional information:
New Batch:
Creating a new batch while in the transaction details screen will create a new AR receipt batch.
The new batch will be created with the Bank Code and Currency, set in the processing code used for the transaction.
Email Receipts:
Email templates need to be enabled in PayFabric for the receipt to send. Instructions on how to set these templates can be found in the PayFabric User Guide. The email receipts will be sent to the addresses specified in the Email and Additional Email fields.
Email Receipt field will default with the email address assigned to the E-mail field under the Address tab of the A/R Customer
Additional Email field will default with the email address assigned to the E-mail field under the Contact tab of the A/R Customer.
Amount Pane:
| Field | Description |
| Authorized Amount | The sum of the open authorizations for the document. |
| Captured Amount | The sum of the captured transactions for the document. |
PayFabric Transaction Screen Buttons:
Process:
Once a transaction has the mandatory fields completed, the transaction can be processed. This button will initiate the call to PayFabric to process the transaction detailed.
Close:
This button will close the PayFabric Transaction window without processing any payment.
Sage Forms
PayFabric Order Entry
PayFabric has been added into the Sage Order Entry screen. This will give the merchant the ability to open the PayFabric Transaction screen to be able to process payment. 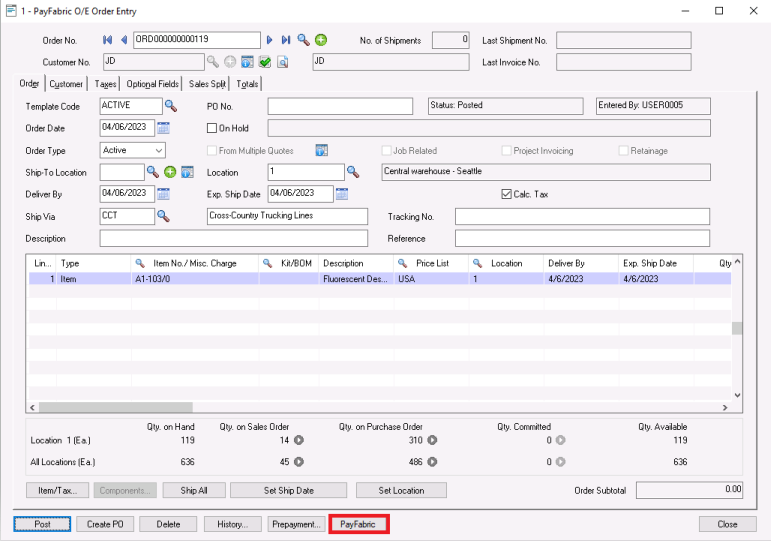
Steps when creating an order:
- Navigate to Order Entry > O/E Transactions > PayFabric Order Entry
- Populate a customer
- Add line items to the order
- Post the order
- Click the PayFabric button to open the PayFabric Transaction window
The following Transaction types are available on the transaction details screen from the Order Entry form:
Capture (if an open Authorization exists)
Note: If a capture or a sale is taken against an Order, then a Prepayment Receipt will be created.
Note: After a successful payment, the totals tab of the order will be updated with the prepayment amount and the outstanding amount will be updated.
Order types supported:
Currently we only support the Active type from Order Entry. This will be the only OE type that will allow for a PayFabric transaction to take place.
Note: If the 'Create Invoice' checkbox is checked, the PayFabric button will be disabled. Additionally, when any line items are being shipped, the PayFabric button will be disabled.
Additional Rules:
Any outstanding Authorizations need to be captured on the Shipment before Invoicing.
Note: You will need to
Capture the Authorization on the Order before shipping
OR
Capture the Authorization on the Shipment before invoicing
PayFabric Shipment Entry
PayFabric has been added onto the Sage Shipment Entry screen. Users will be able to process (Sale or Capture transaction types) directly on a new shipment or a shipment created from an order.
Steps to process in Shipment Entry
- Navigate to Order Entry > O/E Transactions > PayFabric Shipment Entry
- Use the lookup to select a customer or populate through type-in
- Populate line items in the line items section
- Post the shipment
- Click the PayFabric button to open the PayFabric Transaction window
To Process a Sale
When creating a new shipment directly from Shipment Entry, only the Sale Transaction type will be available. Alternatively, if a shipment is created from an Order without an existing Authorization, then only the Sale Transaction type will be available.
To Process a Capture
Shipments can allow the capture transaction type only when an Authorization has been processed on the Order, but not yet captured.
When a capture or a sale is processed against a Shipment, then a Prepayment Receipt will be created and applied to the shipment.
The Shipment totals tab will be updated with the Prepayment amount and the outstanding amount will be updated.
Note: If the 'Create Invoice' checkbox is checked, the PayFabric button will be disabled. Additionally, a shipment with a 'Complete' status will also have the PayFabric button disabled.
PayFabric AR Invoice Entry
PayFabric has been added into the Sage invoice entry screen. This will open the PayFabric Transaction screen to be able to process a sale against the invoice. 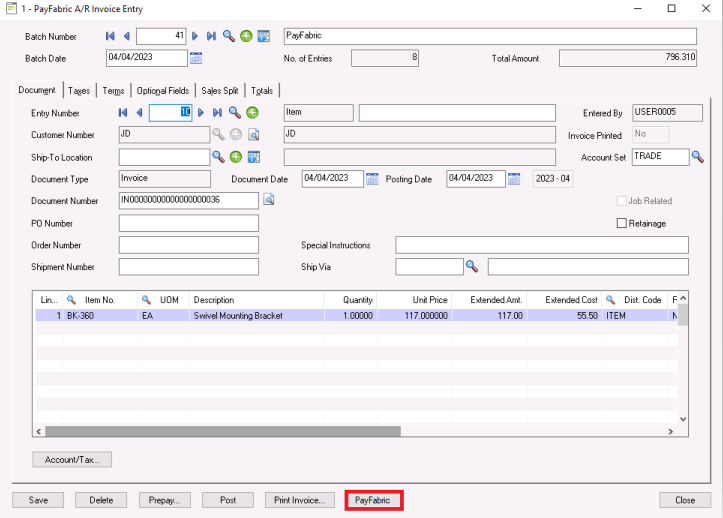
Note: The PayFabric button will be disabled if the selected batch is in a ready to post/posted status.
Steps to process on AR Invoice
- Navigate to Accounts Receivable > A/R Transactions > PayFabric Invoice Entry
- Select a batch number for the invoice
- Add a new entry to the batch
- Populate the customer number
- Add the line items
- Click Add button, this will enable the PayFabric button
- Click the PayFabric button to open the PayFabric Transaction window
- Select a processing code (CC or ACH)
- (Optional) Change the selected batch, by default, the most recent batch matching the bank code and currency of the selected processing code will be selected
- Select an existing payment method or enter a new payment method to process without saving the wallet.
- Click process
- If the transaction has been approved, there will be a confirmation message displayed. Subsequently, the document totals will be updated with the processed amount.
PayFabric AR Invoice will only allow for one payment (pre-payment) to be made directly from the Invoice. In situations where only a partial amount of the invoice is being paid at the time, then an AR Receipt will need to be created and processed for the remaining amount.
PayFabric AR Receipt Entry
PayFabric has been added into the Sage AR Receipt Entry screen. This will give the merchant the ability to open the PayFabric Transaction screen to be able to process payment.
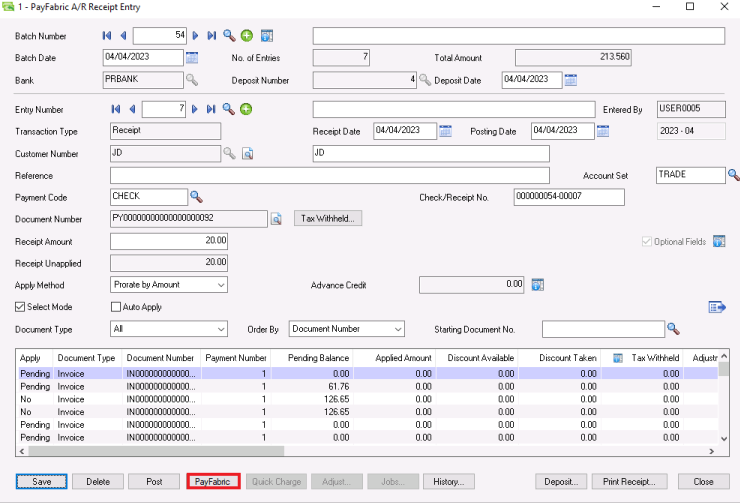
Note: When accessing the PayFabric Transaction window, there is validation for the processing code. The processing code dropdown will only populate codes matching the bank code and currency of the receipt batch based upon the PayFabric Gateway setup.
Supported Receipt Types:
The following Receipt types are currently supported
- Receipt
- Prepayment
- Unapplied Cash
- Misc. Receipt
Steps to process on an AR Receipt:
- Navigate to Accounts Receivable > A/R Transactions > PayFabric Receipt Entry
- Select a batch or create new
- Add a new entry to the batch
- Select the Transaction Type of 'Receipt'
- Populate a customer number
- Enter a receipt amount
- (Optional) Apply the receipt
- Click Add, this will enable the PayFabric button
- Click the PayFabric button
- Select the processing code (CC or ACH)
- Select an existing payment method or enter a new payment method to process without saving the wallet
After processing the payment, the Payment Code on the receipt will be updated to reflect the Payment Code associated to the Processing Code used to process.
Batch Number will be set as the current AR Receipt batch, that the receipt is being created under.
The following Transaction types are available on the transaction details screen from the AR Receipt Entry form:
Note: If the 'PayFabric' button is disabled, there has been an existing PayFabric transaction that has been processed for this receipt. Currently, we will only allow for one PayFabric transaction per AR Receipt.
PayFabric Permissions
User access to PayFabric payment processing can be set by using Sage's security group settings. Additionally, the security settings can control which PayFabric forms can be accessed.
To prevent users from processing on PayFabric Forms
If the user does not have the permission to create receipts, we will prevent them from processing payments. As such, the permission for payment processing can be set through the 'Receipt Entry' permission found in the Accounts Receivable security.
Note: This will affect all applicable forms that PayFabric processing can be accessed.
To prevent users from accessing certain forms
The PayFabric forms can also be controlled by Sage security settings.
User visibility to these forms can be adjusted using the Sage security setting mentioned below.
- PayFabric Order Entry
To hide visibility, user must not have below permissions found under Order Entry:
- Order/Shipment/Invoice Entry
- Order Entry
- Transaction Inquiry - PayFabric Shipment Entry
To hide visibility, user must not have below permissions found under Order Entry:
- Order/Shipment/Invoice Entry
- Shipment Entry
- Transaction Inquiry - PayFabric Invoice Entry (AR)
To hide visibility, user must not have below permissions found under Accounts Receivable:
- Invoice Inquiry
- Invoice Entry - PayFabric Receipt Entry
To hide visibility, user must not have below permissions found under Accounts Receivable:
- Receipt Inquiry
- Receipt Entry
Note: If you would like users to be able to view documents, but not take payments, it is recommended that the user does not have the 'Receipt Entry' permission.
PayFabric Receivables
Turning on the Sync mechanism
- Navigate to windows services
- Search for ReceivablesSyncTimer
- Enable if the service is not running
Note: this will sync over all sage records into PFR once turned on
PayFabric Receivables Records
Overall, when the automatic sync has been initiated, these pages will most likely not require manual user intervention. The most likely scenarios would be for the user to view the integration records page on occasion to monitor for failed records.
PayFabric Incoming Records:
A list of payments in a pending status on PayFabric Receivables that is greater than or equal to the inputted date. Subsequently, the user can specify from that list which of those records to send to the integration queue.
Integration Records:
A list of all pending or failed records. After a record has failed to sync three times, it will display in this window. User has the ability to either manually re-sync the records or delete it from this list.
User is able to do the following actions
Sync: This will sync an individual record that has been selected
Delete: This will delete an individual records from this table that has been selected
Run Full Sync: This will Sync up all Sage 300 records (Currency, Customers, Invoice, Payments)
Receivables Integration Test:
Manually test sending a single record to Pay Fabric Receivables.
The user needs to specify the Record Type and the Record ID and click the test button. If successful, the record is immediately synced to PayFabric Receivables. If the record cannot be synced, the error message will be displayed in the response window.
Sage outgoing records:
This page will return a list of the specific records of the chosen type that have been modified since the specified date and time. Subsequently after the list has been displayed, the user has the option to send those records to the queue.
Record Types that are currently supported for PayFabric Receivables
Currencies - Currencies that exist within Sage300 that also match the currency code in PayFabric. Eg. USD, CAD.
Customers - Customers created from A/R Customers > Customers.
AR Invoice - Posted AR invoices that are either paid or unpaid. Additionally, debit notes will be synced and treated as invoices. AR Invoices of type item or summary can be synced to PFR.
AR Receipts - Posted records of type (Receipt, Prepayment, Unapplied Cash, and Misc Receipt). Apply document will sync the associated payments + invoices.
Order Entry - Once the order/shipment has been converted to an AR Invoice through day end processing and subsequently posted, it will be synced to PFR.
Record Types that are currently supported to be imported to Sage
Payments - Payments(CC or ACH) that are made directly on invoices will be imported and applied within Sage. The payments should be inserted into the latest batch matching the bank code. Otherwise, if no batch is matching, one will be created.
Prepayments - Payments that are processed within PFR with no relations to invoices. The following will be sent into Sage with a type of prepayment. The ability to process prepayments will need to be enabled within PFR (disabled by default I believe). Uses the same logic as the payments when inserting into the batches.
Note: Applications(applying payments/credits within PFR) are not currently supported. Thus, it is recommended to disable the ‘Apply Credits’ functionality in PFR.
Copyright Information
Copyright © 2025 North49 Business Solutions. All rights reserved. Your right to copy this documentation is limited by copyright law and the terms of the software license agreement. As the software licensee, you may make a reasonable number of copies or printouts for your own use. Making unauthorized copies, adaptations, compilations, or derivative works for commercial distribution is prohibited and constitutes a punishable violation of the law.
Trademarks: PayFabric ® for Sage 300, North49 are either registered, trademarks or trademarks of North49 Business Solutions in Canada. PayFabric ® is a registered trademarks of Nodus Technologies, Inc in the United States.
The names of actual companies and products mentioned herein may be trademarks or registered marks - in the United States and/or other countries - of their respective owners.
The names of companies, products, people, and/or data used in window illustrations and sample output are fictitious and are in no way intended to represent any real individual, company, product, or event, unless otherwise noted.
Warranty: Disclaimer North49 Business Solutions disclaim any warranty regarding the sample code contained in this documentation, including the warranties of merchantability and fitness for a particular purpose.
Limitation of Liability: The content of this manual is furnished for informational use only, is subject to change without notice, and should not be construed as a commitment by North49 Business Solutions. North49 Business Solutions assumes no responsibility or liability for any errors or inaccuracies that may appear in this manual. North49 Business Solutions nor anyone else who has been involved in the creation, production or delivery of this documentation shall be liable for any indirect, incidental, special, exemplary or consequential damages, including but not limited to any loss of anticipated profit or benefits, resulting from the use of this documentation or sample code.
License agreement Use of this product is covered by a license agreement provided with the software product. If you have any questions, please call North49 Business Solutions Support at 909-482-4701